规则手册
编写可移植包非常重要,因为它可以确保你的用户无论使用哪种包管理器都能获得最佳体验。
¥Writing portable packages is incredibly important, as it ensures that your users will benefit from an optimal experience regardless of their package manager.
为了帮助解决这个问题,此页面详细介绍了你应该遵循的最新良好实践集合,以使你的包在所有三个主要包管理器(Yarn、pnpm 和 npm)上无缝运行,如果你想了解更多信息,请参阅说明。
¥To help with that, this page details the up-to-date collection of good practices you should follow in order to make your package work seamlessly on all three main package managers (Yarn, pnpm, and npm), and explanations if you want to learn more.
软件包应仅需要其依赖中正式列出的内容
¥Packages should only ever require what they formally list in their dependencies
为什么?否则你的包将容易受到不可预测的 hoisting 的影响,这将导致你的一些消费者遇到伪随机崩溃,具体取决于他们将要使用的其他包。
¥Why? Because otherwise your package will be susceptible to unpredictable hoisting that will lead some of your consumers to experience pseudo-random crashes, depending on the other packages they will happen to use.
想象一下 Alice 使用 Babel。Babel 依赖于一个实用程序包,而该实用程序包本身依赖于旧版本的 Lodash。由于实用程序包已经依赖于 Lodash,Babel 维护者 Bob 决定使用 Lodash 而没有在 Babel 本身中正式声明它。
¥Imagine that Alice uses Babel. Babel depends on an utility package which itself depends on an old version of Lodash. Since the utility package already depends on Lodash, Bob, the Babel maintainer, decided to use Lodash without formally declaring it in Babel itself.

由于提升,Lodash 将被放在顶部,树变成这样:
¥Because of the hoisting, Lodash will be put at the top, the tree becoming something like this:
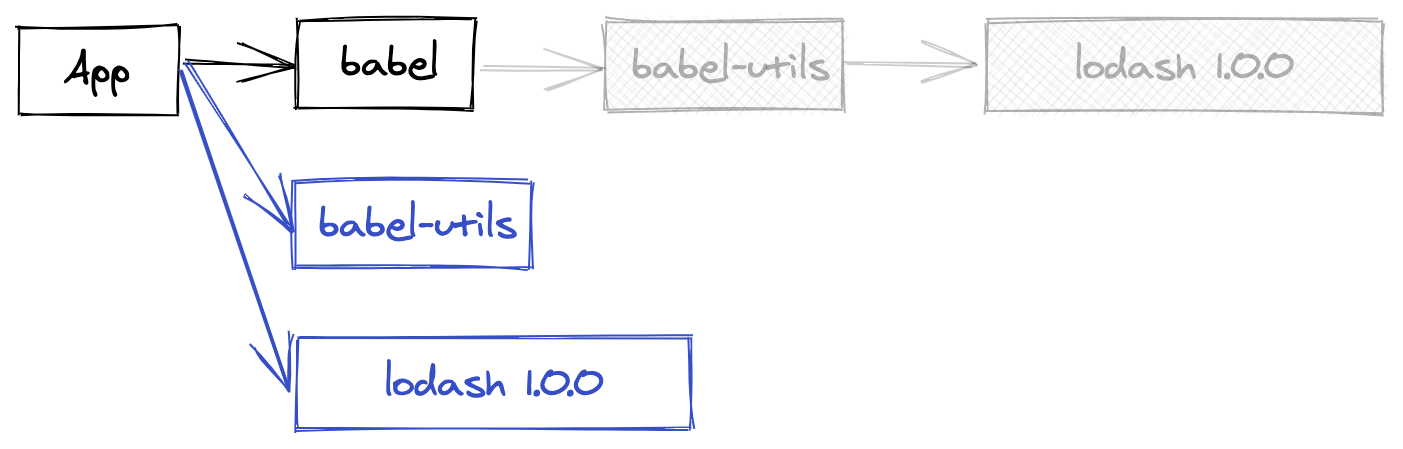
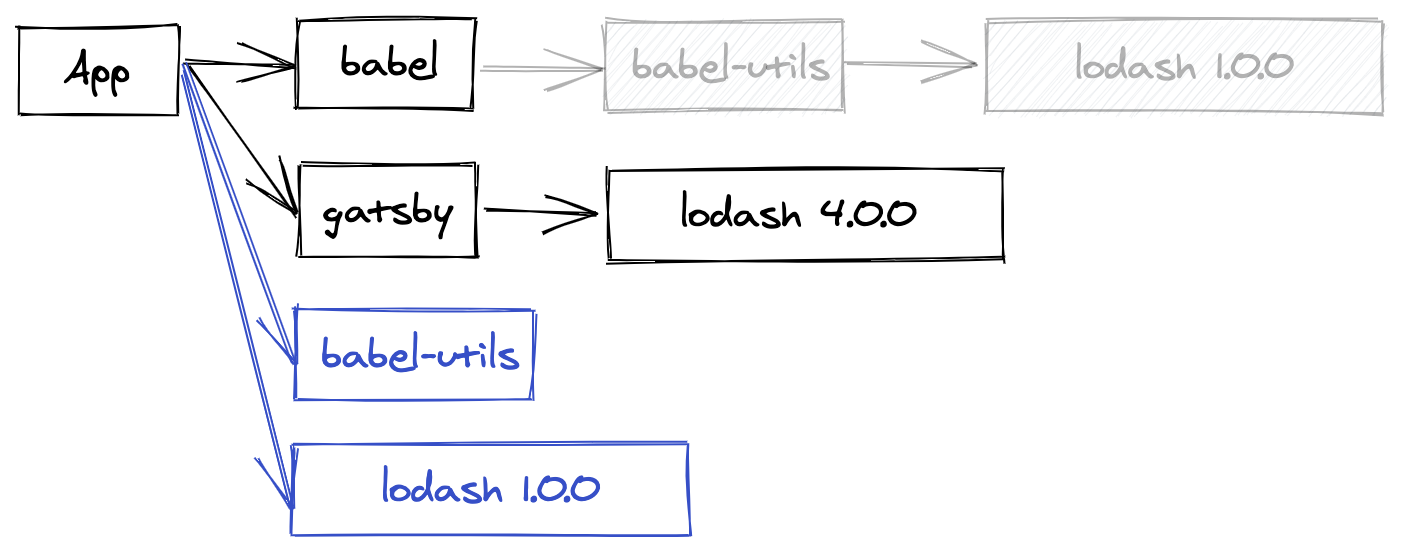
到目前为止,一切都很好:实用程序包仍然需要 Lodash,但我们不再需要在 Babel 中创建子目录。现在,想象一下 Alice 还将 Gatsby 添加到组合中,我们假装它也依赖于 Lodash,但这次是现代版本;树将如下所示:
¥So far, everything is nice: the utility package can still require Lodash, but we no longer need to create sub-directories within Babel. Now, imagine that Alice also adds Gatsby to the mix, which we'll pretend also depends on Lodash, but this time on a modern release; the tree will look like this:

提升变得更有趣 - 由于 Babel 没有正式声明依赖,因此可能会出现两种不同的提升布局。第一个与我们之前已有的几乎完全相同,不同之处在于我们现在有两个 Lodash 副本,只有一个副本被提升到停止状态,因此不会引起冲突:
¥The hoisting becomes more interesting - since Babel doesn't formally declare the dependency, two different hoisting layouts can happen. The first one is pretty much identical to what we already had before, with the exception that we now have two copies of Lodash, with only a single one hoisted to the stop so we don't cause a conflict:
但第二种布局也同样可能!这时事情就变得更加棘手了:
¥But a second layout is just as likely! And that's when things become trickier:
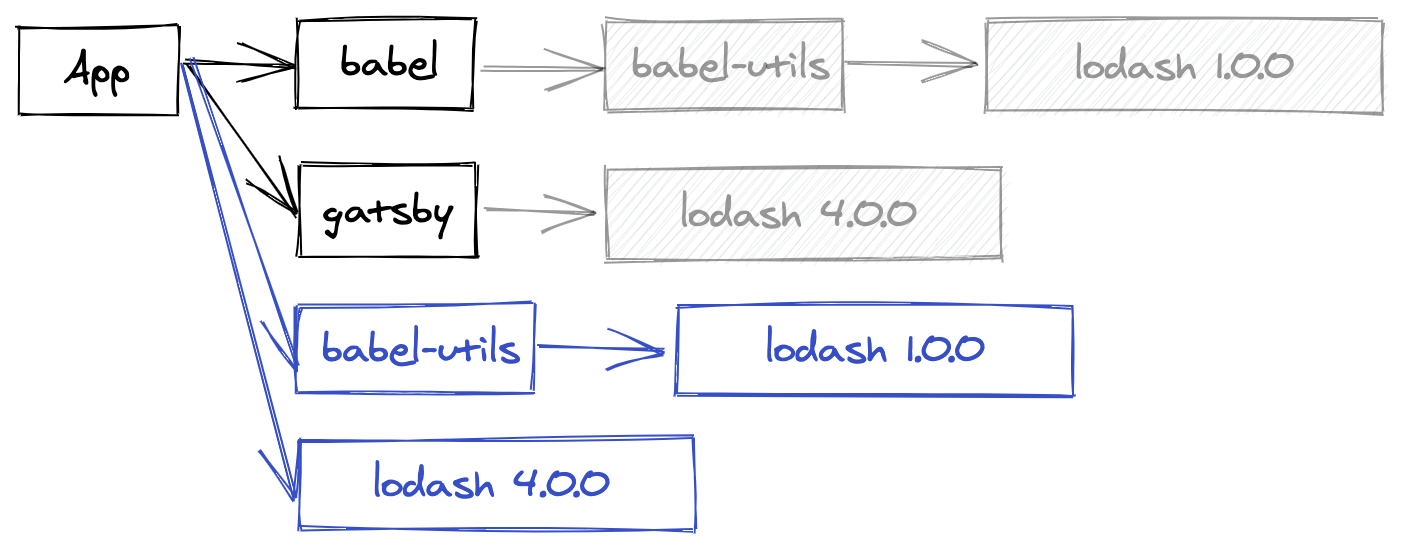
首先,让我们检查一下这个布局是否有效:Gatsby 仍然获得其 Lodash 4 依赖,Babel 实用程序包仍然获得 Lodash 1,而 Babel 本身仍然获得实用程序包,就像以前一样。但其他东西变了!Babel 将不再访问 Lodash 1!它将检索 Gatsby 提供的 Lodash 4 副本,可能与 Babel 最初的预期不兼容。在最好的情况下,应用会崩溃,在最坏的情况下,它会默默通过并生成不正确的结果。
¥First, let's check that this layout is valid: Gatsby still gets its Lodash 4 dependency, the Babel utility package still gets Lodash 1, and Babel itself still gets the utility package, just like before. But something else changed! Babel will no longer access Lodash 1! It'll instead retrieve the Lodash 4 copy that Gatsby provided, likely incompatible with whatever Babel originally expected. In the best case the application will crash, in the worst case it'll silently pass and generate incorrect results.
如果 Babel 将 Lodash 1 定义为其自己的依赖,则包管理器将能够编码此约束并确保无论提升如何都能满足要求。
¥If Babel had instead defined Lodash 1 as its own dependency, the package manager would have been able to encode this constraint and ensure that the requirement would have been met regardless of the hoisting.
解决方案:在大多数情况下(当缺少的依赖是实用程序包时),修复实际上只是将缺少的条目添加到 dependencies 字段。虽然经常如此,但有时会出现一些更复杂的情况:
¥Solution: In most cases (when the missing dependency is a utility package), the fix is really just to add the missing entry to the dependencies field. While often enough, a few more complex cases sometimes arise:
-
如果你的包是一个插件(例如
babel-plugin-transform-commonjs)并且缺少的依赖是核心(例如babel-core),你需要在peerDependencies字段 内注册依赖。¥If your package is a plugin (for example
babel-plugin-transform-commonjs) and the missing dependency is the core (for examplebabel-core), you would need to instead register the dependency inside thepeerDependenciesfield. -
如果你的包是自动加载插件的东西(例如
eslint),那么对等依赖显然不是一个选项,因为你无法合理地列出所有插件。相反,你应该使用createRequire函数(或其 polyfill)代表列出要加载的插件的配置文件加载插件 - 无论是 package.json 还是自定义文件(如.eslintrc.js文件)。¥If your package is something that automatically loads plugins (for example
eslint), peer dependencies obviously aren't an option as you can't reasonably list all plugins. Instead, you should use thecreateRequirefunction (or its polyfill) to load plugins on behalf of the configuration file that lists the plugins to load - be it the package.json or a custom one like the.eslintrc.jsfile. -
如果你的包仅在用户控制的特定情况下需要依赖(例如,如果消费者实际使用 SQLite3 数据库,
mikro-orm仅依赖于sqlite3),请使用peerDependenciesMeta字段 将对等依赖声明为可选,并在未满足时静音任何警告。¥If your package only requires the dependency in specific cases that the user control (for example
mikro-ormwhich only depends onsqlite3if the consumer actually uses a SQLite3 database), use thepeerDependenciesMetafield to declare the peer dependency as optional and silence any warning when unmet. -
如果你的包是实用程序的元包(例如 Next.js,它本身依赖于 Webpack,因此它的消费者不必这样做),情况会有点复杂,你有两个不同的选择:
¥If your package is a meta-package of utilities (for example Next.js, which itself depends on Webpack so that its consumers don't have to do it), the situation is a bit complicated and you have two different options:
-
首选方法是将依赖(在 Next.js 的情况下为
webpack)列为常规依赖和对等依赖。Yarn 将此模式解释为 "具有默认的对等依赖",这意味着你的用户将能够在需要时拥有 Webpack 包的所有权,同时仍允许包管理器在提供的版本与你的包期望的版本不兼容时触发警告。¥The preferred one is to list the dependency (in Next.js's case,
webpack) as both a regular dependency and a peer dependency. Yarn will interpret this pattern as "peer dependency with a default", meaning that your users will be able to take ownership of the Webpack package if they need to, while still giving the package manager the ability to emit a warning if the provided version is incompatible with the one your package expects. -
另一种方法是将依赖重新导出为公共 API 的一部分。例如,Next 可以公开仅包含
module.exports = require('webpack')的next/webpack文件,而消费者将需要它而不是典型的webpack模块。但是,这不是推荐的方法,因为它不能很好地与期望 Webpack 成为对等依赖的插件配合使用(它们不知道他们需要使用这个next/webpack模块)。¥An alternative is to instead re-export the dependency as part of your public API. For example, Next could expose a
next/webpackfile that would only containmodule.exports = require('webpack'), and consumers would require that instead of the typicalwebpackmodule. This isn't the recommended approach, however, because it wouldn't play well with plugins that expect Webpack to be a peer dependency (they wouldn't know that they need to use thisnext/webpackmodule instead).
-
模块不应硬编码 node_modules 路径来访问其他模块
¥Modules shouldn't hardcode node_modules paths to access other modules
为什么?提升使得无法确保 node_modules 文件夹的布局始终相同。事实上,根据确切的安装策略,node_modules 文件夹可能甚至不存在。
¥Why? The hoisting makes it impossible to be sure that the layout of the node_modules folder will always be the same. In fact, depending on the exact install strategy, the node_modules folders may not even exist.
解决方案:如果你需要通过 fs API 访问依赖之一的文件(例如,读取依赖的 package.json),只需使用 require.resolve 即可获取路径,而无需对依赖位置做出假设:
¥Solution: If you need to access one of your dependencies' files through the fs API (for example to read a dependency's package.json), just use require.resolve to obtain the path without having to make assumptions about the dependency location:
const fs = require(`fs`);
const data = fs.readFileSync(require.resolve(`my-dep/package.json`));
如果你需要访问依赖之一的依赖(我们真的不建议这样做,但在某些特殊情况下可能会发生),请使用 createRequire 函数,而不是硬编码 node_modules 路径:
¥If you need to access one of your dependencies' dependency (we really don't recommend that, but in some fringe cases it may happen), instead of hardcoding the node_modules path, use the createRequire function:
const {createRequire} = require(`module`);
const firstDepReq = createRequire(require.resolve(`my-dep/package.json`));
const secondDep = firstDepReq(`transitive-dep`);
请注意,虽然 createRequire 是 Node 12+,但名称为 create-require 下存在一个 polyfill。
¥Note that while createRequire is Node 12+, a polyfill exists under the name create-require.
CLI 参考
¥User scripts shouldn't hardcode the node_modules/.bin folder
为什么?.bin 文件夹是一个实现细节,根据安装策略,可能根本不存在。
¥Why? The .bin folder is an implementation detail, and may not exist at all depending on the install strategy.
解决方案:如果你正在编写 script,你只需通过其名称引用二进制文件即可!因此,与其使用 node_modules/.bin/jest -w,不如只编写 jest -w,这样就可以正常工作。如果由于某种原因 jest 不可用,请检查当前包是否正确 将其定义为依赖。
¥Solution: If you're writing a script, you can just refer to the binary by its name! So instead of node_modules/.bin/jest -w, prefer just writing jest -w which will work just fine. If for some reason jest isn't available, check that the current package properly defines it as a dependency.
有时你可能会发现自己有稍微复杂一些的需求,例如,如果你希望生成具有特定 Node 标志的脚本。根据具体情况,我们建议通过 NODE_OPTIONS 环境变量 而不是 CLI 传递选项,但如果这不是一个选项,你可以使用 yarn bin name 获取指定的二进制路径:
¥Sometimes you may find yourself having slightly more complex needs, for example if you wish to spawn a script with specific Node flags. Depending on the context we recommend passing options via the NODE_OPTIONS environment variable rather than the CLI, but if that's not an option you can use yarn bin name to get the specified binary path:
yarn node --inspect $(yarn bin jest)请注意,在这种特殊情况下,yarn run 还支持 --inspect 标志,因此你只需编写:
¥Note that, in this particular case, yarn run also supports the --inspect flag so you could just write:
已发布的软件包应避免在其脚本中使用 npm run
¥Published packages should avoid using npm run in their scripts
为什么?这是一个棘手的问题……基本上,归结为:包管理器不可互换。在另一个安装的项目上使用一个包管理器会带来麻烦,因为它们遵循不同的配置设置和规则。例如,Yarn 提供了一个钩子系统,允许用户跟踪执行了哪些脚本以及执行了多少时间。因为 npm run 不知道如何调用这些钩子,它们会被忽略,从而导致消费者的体验令人沮丧。
¥Why? This is a tricky one ... basically, it boils down to: package managers are not interchangeable. Using one package manager on a project installed by another is a recipe for troubles, as they follow different configuration settings and rules. For example, Yarn offers a hook system that allows its users to track which scripts are executed and how much time they take. Because npm run wouldn't know how to call these hooks, they would get ignore, leading to frustrating experiences for your consumers.
解决方案:虽然不是最美观的选项,但目前最便携的选项是简单地替换安装后脚本中的 npm run name(或 yarn run name)并由以下内容派生:
¥Solution: While not the most esthetically pleasing option, the most portable one at the moment is to simply replace npm run name (or yarn run name) in your postinstall scripts and derived by the following:
$npm_execpath run <name>
$npm_execpath 环境变量将被正确的二进制文件替换,具体取决于你的消费者将使用的包管理器。Yarn 还支持只调用 run <name> 而不提及任何包管理器,但到目前为止,没有其他包管理器这样做。
¥The $npm_execpath environment variable will get replaced by the right binary depending on the package manager your consumers will use. Yarn also supports just calling run <name> without any mention of the package manager, but to this date no other package manager does.
软件包绝不应在安装后之外的自己的文件夹中写入内容
¥Packages should never write inside their own folder outside of postinstall
为什么?根据安装策略,包可能会保存在只读数据存储中,其中写入访问将被拒绝。使用 "system-global" 存储时尤其如此,修改一个包的源可能会破坏同一台机器上依赖于它的所有项目。
¥Why? Depending on the install strategy, packages may be kept in read-only data stores where write accesses will be rejected. This is particularly true when using "system-global" stores, where modifying the sources for one package would risk corrupting all the projects depending on it from the same machine.
解决方案:只需在另一个目录中写入,而不是你自己的包中。任何方法都可以,但一个非常常见的习惯用法是使用 node_modules/.cache 文件夹来存储缓存数据 - 例如,这就是 Babel、Webpack 等所做的。
¥Solution: Just write in another directory rather than your own package. Anything would work, but a very common idiom is to use the node_modules/.cache folder in order to store cache data - that's for example what Babel, Webpack, and more do.
如果你确实需要写入包的源文件夹(但实际上,我们以前从未遇到过这种用例),你仍然可以选择使用 preferUnplugged 指示 Yarn 禁用包上的优化并将其存储在其自己的项目本地副本中,你可以在其中随意对其进行修改。
¥If you absolutely need to write into your package's source folder (but really, we never came across this use case before), you still have the option to use preferUnplugged to instruct Yarn to disable optimizations on your package and store it inside its own project-local copy, where you'll be able to mutate it at will.
软件包应在发布前使用 prepack 脚本生成 dist 文件
¥Packages should use the prepack script to generate dist files before publishing
为什么?原始 npm 支持 许多不同的脚本。事实上,太多了,以至于很难知道在哪种情况下要使用哪种脚本。特别是,prepack、prepare、prepublish 和 prepublish-only 脚本之间的细微差别导致许多人在错误的上下文中使用了错误的脚本。因此,Yarn 2 弃用了大多数脚本并将它们整合到一组受限的可移植脚本中。
¥Why? The original npm supported many different scripts. So much, in fact, that it became very difficult to know which script one would want to use in which context. In particular, the very subtle differences between the prepack, prepare, prepublish, and prepublish-only scripts led many to use the wrong script in the wrong context. For this reason, Yarn 2 deprecated most of the scripts and consolidated them around a restricted set of portable scripts.
解决方案:如果你希望在发布包之前生成 dist 工件,请始终使用 prepack 脚本。它将在调用 yarn pack(它本身在调用 yarn npm publish 之前被调用)、在将你的 git 存储库克隆为 git 依赖时以及在你运行 yarn prepack 的任何时间被调用。对于 prepublish,切勿将其与副作用一起使用 - 它的唯一用途应该是在发布步骤之前运行测试。
¥Solution: Always use the prepack script if you wish to generate dist artifacts before publishing your package. It will get called before calling yarn pack (which itself is called before calling yarn npm publish), when cloning your git repository as a git dependency, and any time you will run yarn prepack. As for prepublish, never use it with side effects - its only use should be to run tests before the publish step.